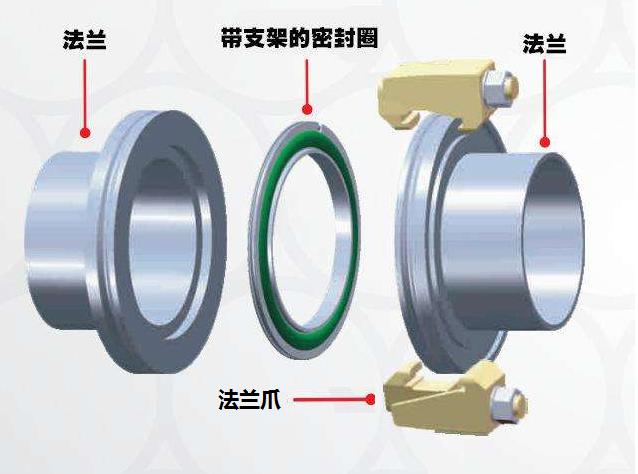
ISO flange vacuum calipers are a common device used to connect vacuum systems and are widely used in various vacuum applications, including research laboratories, industrial production, semiconductor manufacturing, and other fields. They can connect various vacuum components such as vacuum chambers, pumps, vacuum valves, etc. If replacement or maintenance of connecting components is required, the assembly and disassembly process of ISO flange calipers is relatively simple and can be carried out quickly, thereby reducing downtime. Installing and disassembling ISO flange calipers is usually relatively simple, as they use bolts and clamping fixtures without the need for special tools or skills. This reduces the maintenance and repair costs of the equipment. ISO flange calipers use elastic sealing rings, which can provide reliable sealing performance. This is crucial for maintaining the high vacuum or specific pressure requirements of the vacuum system.

Preparation: Ensure that the work area is clean and free of debris or dirt. Verify the integrity and cleanliness of the required ISO flange calipers and flange connectors.
Prepare ISO flange connectors: If not already installed on the required components, ensure that the required ISO flange connectors (usually flange rings) are correctly installed on the components. Check the sealing surface of the flange ring to ensure it is clean, flat, and undamaged.
Install ISO flange vacuum calipers: Place the jaws (usually two or four) of the ISO flange vacuum calipers onto the desired flange connection. Ensure that the jaws of the calipers are evenly distributed around the flange connection.
Tighten the caliper:
Use the handle or wrench of the caliper to evenly close the jaws of the caliper onto the flange connection, ensuring a tight clamping seal. Check the jaws of the calipers one by one to ensure they tightly grip the flange connection to ensure good sealing.
Connecting other components: Install another set of ISO flange connectors (usually flange rings) onto another component that needs to be connected, such as a vacuum chamber, pump, valve, etc. Ensure that the flange connections are aligned to ensure that the jaws of the calipers can grip them smoothly.
Tighten flange bolts: Use appropriate bolts and nuts to connect the flange connectors together. Ensure that the bolts are evenly tightened to ensure a secure and sealed connection.
Vacuum test: After installation, perform a vacuum test to ensure good system sealing. This can be accomplished by using a vacuum gauge or other related instruments.
Caution: Avoid using damaged ISO flange vacuum calipers, flange connectors, bolts, or nuts. Do not overtighten bolts to avoid damaging flange connections or flange ring seals. Be careful when connecting and disconnecting components to prevent damage or contamination of the vacuum system.
Please note that the specific installation steps for ISO flange vacuum calipers may vary depending on the manufacturer and model. Therefore, it is recommended to refer to the manufacturer's guidelines and installation manual of the relevant equipment before installation to ensure correct installation and operation.